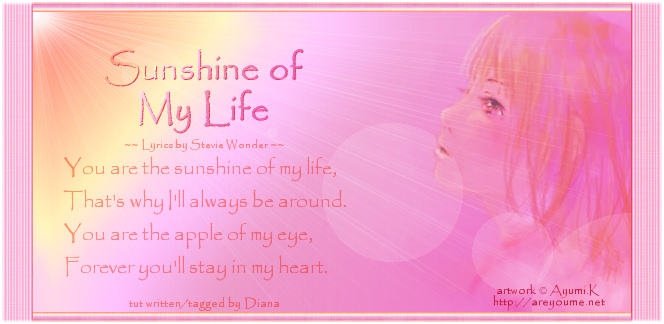
Sunshine
You will need the following for this lesson:
- Gradient 'chrisanticpation'- a gradient by MsKris at PaintShopStop - download HERE
- Gradient 'KJC_Fade_to_Pink'- a gradient by KJC Creations (no link because I can't find her new web site) - download HERE
- Texture 'Hatch fine' - included in PSP9 - download HERE
- Font of your choice, or the font 'Papyrus' that I used - download HERE
- Image 'ayumi_k_image.pspimage' - if you want to make the masked image (Part 1) - download HERE
OR - Image 'ayumi_k_image_masked.pspimage' if you want to use the finished masked image (start with Part 2) - download HERE
The image used is one of Ayumi.K's fantastic pieces. She graciously allows the PSP community to use her artwork. We are lucky to have such a talented and sharing artist. I encourage you to take the time to visit her site.
I am taking a tubing class right now, but to be honest with you it is not going very fast. And, I am definitely a very slow tuber. So, when I found this image but couldn't find a tube of it, I decided to try and see if adding a mask layer would do the trick. And what do you know, it worked - at least I think it did.
I was having trouble deciding what to cover first, but finally decided to do the 'Masked Image' part first, because I think most of you will use the image provided the first time you make the tag. If, however, this is the first time you have done this tut, and you are using a different image, I suggest that you start with 'Part 2 - Tag' and do steps 1 - 22 first. Then go back and do 'Part 1' (or 'Part 3' - see next paragraph), and finally finish off 'Part 2 - Tag'. I hope I am not confusing you all too much.
I have also written a Part 3 to this tutorial, giving you another way to do the masked image. This mini-tut will be helpful if your image has a simple, non-patterned background and does not take up the entire height of the tag background, for example, if you want to place it further down in the tag as I did in the example shown in Part 3.
If you like, you can use the 'aymui_k_masked_image' file included in the supplies and skip to 'Part 2 - Tag' - but I hope you will give 'Part 1 - Masked Image' a try! Enough of all this talk. To the tut!
Part 1 - Masked Image
- Open the file 'ayumi_k_image'. Duplicate (Shift + D). Close the original image.
- From the 'Layers Palette', right-click and select 'Promote Background Layer'.
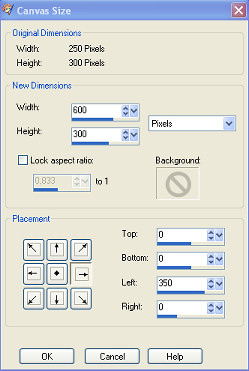
- Go to 'Image / Canvas size' and use these settings:
- Add a new raster layer ('Layers / New Raster Layer'). Move the new 'Raster 2' layer below the 'Raster 1' layer.
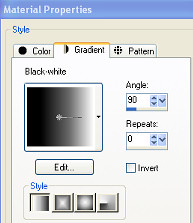
- Set your background to 'Color' #c597be (I used the 'Dropper Tool' and selected the color at the middle left edge of the image.) Set your foreground to 'Gradient' with these settings:
- Use the 'Flood Fill Tool' to fill the 'Raster 2' layer with the background color #c597be.
- Go to 'Layers / Merge Visible'.
- First, I want to say that there may be an easier way to do the next 'masked' part. But, this is what I came up with. If you know of an easier way, please let me know.
Go to 'Layers / New Mask Layer / Show All'. - Go to the 'Layers Palette' and activate/highlight the 'Mask - Merged' layer. It should be 'white'. Fill this layer with the foreground 'Gradient'.
- Go to 'Layers / Merge / Merge Group'.
- Save this image as a .pspimage and name it 'ayumi_k_masked_image'. Minimize your image. Now you are ready for 'Part 2'.
Part 2 - Tag
- Create a new image, 600 x 300, Transparent.
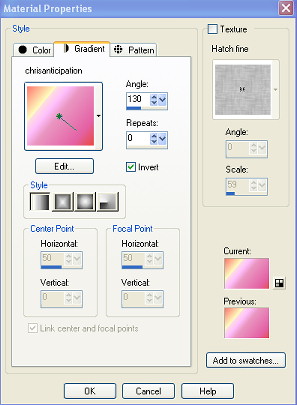
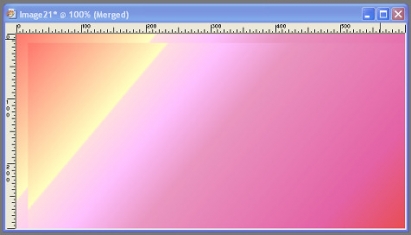
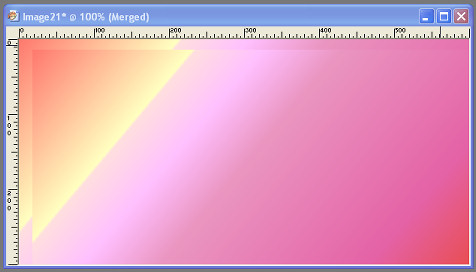
- Set your background to 'Color' #ffffff (white). Set your foreground to 'Gradient' with these settings:
- With 'Raster 1' layer active, add a new raster layer ('Layers / New Raster Layer') and fill the layer with the foreground gradient.
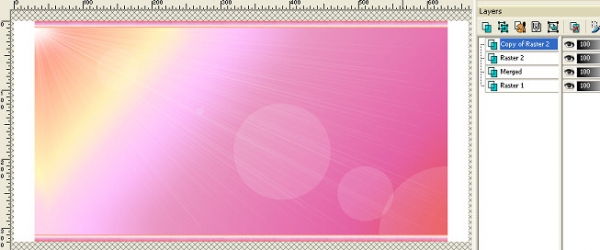
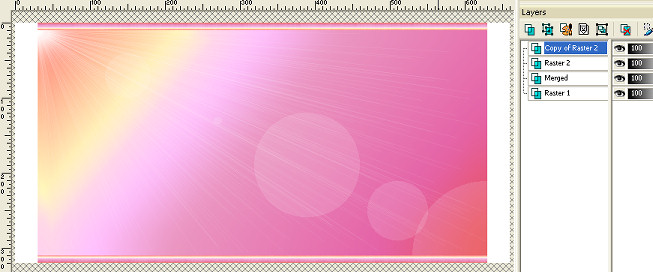
- Duplicate 'Raster 2' (right-click and choose 'Duplicate'). With the 'Copy of Raster 2' active, use the 'Move Tool' to place the new gradient layer (copy) down and to the right as shown here:
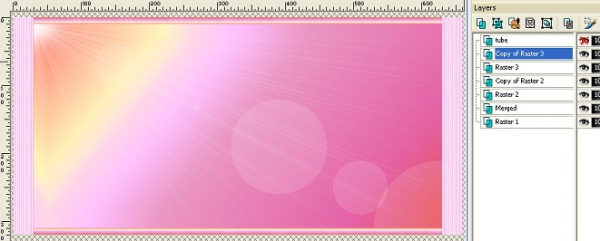
- Hide the 'Raster 1' layer, so that only the 2 gradient layers (Raster 2 and Copy of Raster 2) are visible. Go to 'Layers / Merge Visible'.
- With the 'Merged Layer' active, go to 'Adjust / Blur / Motion Blur' and use these settings:

- With the 'Merged Layer' active, go to 'Effects / Illumination Effects / Sunburst' and use these settings:

- In this tut, I want to show you how you can add borders by using selections, when you want to have more control over the final result, as I did for this tag.
First, we need to change the canvas size, so go to 'Image / Canvas Size' and use these settings:
- Activate/Highlight the 'Raster 1' layer. Make it visible again (click on the 'eye'). Click on the 'Flood Fill Tool' and fill the layer with the background color 'white'.
- Activate/Highlight the 'Merged' layer (top layer).
- We will be making custom selections, so click on the 'Selection Tool' and in the 'Options Palette' click on the 'Custom Selection Tool' (outlined in the screen shot below):

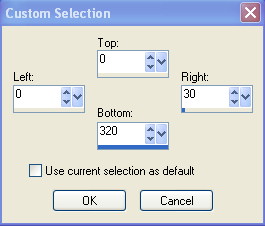
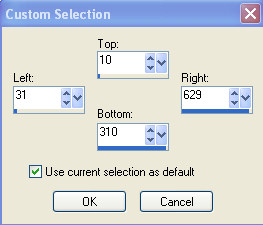
- We want 30 pixel side borders and 10 pixel top and bottom borders. The top and bottom borders should fit in between the side borders. Since we know all this we can start making our custom selections. You need these settings to select the transparent area at the top of the image:

- When you click 'OK', your image should look like this:

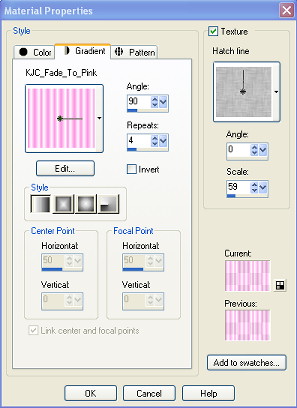
- Set your foreground to 'Gradient' as shown below. Note that the 'Texture - Hatch fine' has been selected and set with a scale of '59 (your 'Previous' will be different than mine):

- With your selection still active, add a new raster layer and fill this new layer with the foreground gradient. Select None (Ctrl +D).
- Duplicate this layer (right-click and choose 'Duplicate'). Then go to 'Image / Flip'. Your image should look something like this:
- Now we need to do the side borders. Set the foreground to 'Gradient' with the following settings ('Texture' is still checked):
- Click on the 'Selection Tool' and in the 'Options Palette' click on the 'Custom Selection Tool'. Use these settings for the left side border:
- Add a new raster layer, and 'Flood Fill' the selection with your foreground gradient. Select None (Ctrl + D).
- Duplicate this layer (right-click and select 'Duplicate'). With the copy active, go to 'Image / Mirror'. Your image and layers should look something like this:
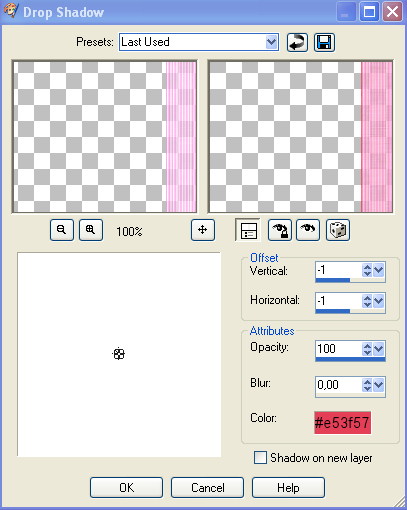
- Activate the 'Raster 3' layer (left side border), and go to 'Effects / 3D Effects / Drop Shadow'. Use these settings (I chose the dark pink from the right side of the image - #ea697c):

- Activate the 'Copy of Raster 3' layer (right side border), and go to 'Effects / 3D Effects / Drop Shadow'. Use these settings ( 'lightness' of the color used for the left side border reduced, otherwise it would not have been visible - 'Color' = #e53f57):
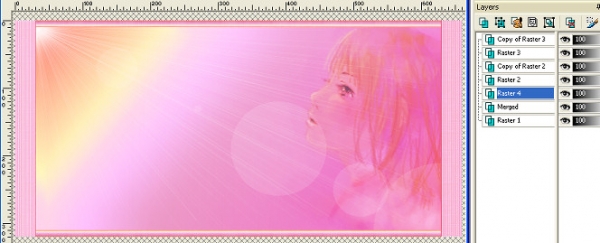
- Now for the image! Activate the 'ayumi_k_masked_image'. Go to 'Selections / Select All (Ctrl + A)' - it is very important that you remember to select all. Go to 'Edit / Copy'.
- Go back to the main image and activate/highlight the 'Merged' layer. Add a new raster layer.
- I wanted the image to be inside the drop shadows on the left and right. So, click on the 'Selection Tool' and in the 'Options Palette' click on the 'Custom Selection Tool'. Use these settings:
- Choose 'Edit / Paste / Paste Into Selection', then 'Select None (Ctrl + D)'.
- With the image layer ('Raster 4') still active, change the 'Blend Mode' to 'Hard Light'. If you are using a different image and background colors, you may want to use a different 'Blend Mode' setting. (In fact, the technique with the masked image may not work with all images.) If you did 'Part 3' instead of 'Part 1', go HERE to see the 'Blend Mode' settings used.
- At this point your image and layers should look similar to this:
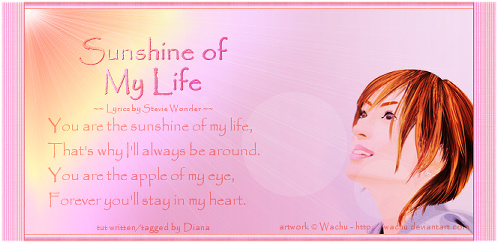
- Now for the text! If you've never done one of my tuts, you can read my explanation HERE for why I use vector text (and keep text as a vector).
For the large title text, use the following settings:
Activate the 'Text Tool'. Close the foreground and set the background to the same gradient used in step 6 (Tip: Right-click in the 'Background and Fill Properties Box' and you will find it in the 'Recent Materials'). Notice that the setting for 'Leading' is set to -0,3 to reduce the distance between the lines of text. - Click with the mouse and enter your text. Click 'Apply'.
- With the text layer highlighted (not just the Vector layer - but the text layer you just typed in), right-click and choose 'Create Raster Selection'. Then, go to 'Selections / Promote Selection to Layer'.
- Change the 'Blend Mode' to 'Luminance' (not 'Luminance (legacy)').
- Go to 'Effects / 3D Effects / Drop Shadow' and use these settings - color #e53f57:

- Select None (Ctrl + D).
- For the song text, change the background to color '#ffa08b' (foreground still be closed), and use the settings below. Note that 'Leading' is set to '0', but you may want to reduce it like before if your text is longer than mine.

- I chose not to add a drop shadow to the song text as I wanted it to be 'crisp', so to speak. But, you may prefer to add a drop shadow.
- If you are using the image provided, please do not forget to add a text layer with Ayumi K's copyright information (©Aymumi.K - http://areyoume.net)!
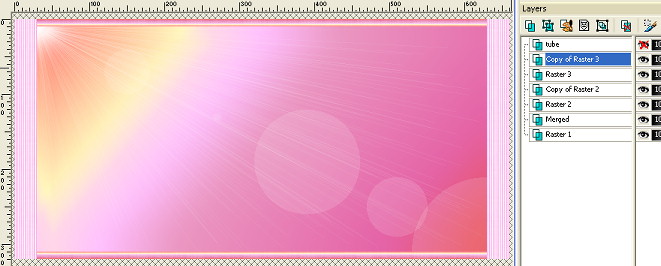
- Well, we are almost finished. At this point, you could merge all of your layers before you added a little border around the entire background, but as most of you know by now, I love to keep my layers and I wanted to do something a little different for the border! So, if you want to do like me, make sure you have saved your image - with all the layers - as a .pspimage file. Then duplicate this image (Shift + D), and close the original. Or, you can just skip this step (save your file, though).
- Go to 'Layers / Merge / Merge All (flatten).
- Go to 'Image / Add Borders' and add a 2 pixel, symmetric white (#ffffff).
- Then right-click and choose 'Promote Background Layer'.
- Activate the 'Selection - Magic Wand Tool' with these settings:

- Click on the thin white border with the 'Magic Wand Tool'. Then, right-click and choose 'Promote Selection to Layer'. Select None (Ctrl + D).
- Change the 'Blend Mode' on the 'Promoted Selection' layer to 'Screen'. Stay on the 'Promoted Selection' layer.
- Go to 'Adjust / Blur / Average' and set 'File aperture' to '5'.
- And now your tag is finished. You may want to resize your tag, but make sure your text is still legible! Finally, export as a.jpg ('File / Export / Jpeg Optimizer'). I set the 'Compression Value' to '5' with 'Chroma subsampling' unchanged. But, I have recently discovered that you can change the 'Chroma subsampling' to the one right below (None) and reduce the size a bit while at the same time having very little - if any - affect on the quality.


Go to Part 3 for an explanation on how I did the masked image in this tag.