Summer Flower

Written for PSP9 but you can probably do it with other versions. I will test it in newer versions when I get time. :)
You will need the following for this lesson:
Image of your choice (if you are going to use my selection file and/or coordinates your image needs to be 600 x 477),
OR the image that I have used - download HERE.
(This is a photo I took, so please do not change the filename and include the copyright if you use it. Thanks!)
If you are going to use my image, you may also want to use my seamless tile - download HERE.
You can either draw the lines on the right side of the tag, or use my selection file (PSP9)- download HERE.
OR, you can use this psp7 file with the selections saved to the alpha channnel - download HERE.
Fonts of your choosing,
OR the fontsBD Engraved Regular' and 'Bookman Old Style' that I have used - download HERE.
Let's get started. :)
- Open the seamless tile provided in the supplies. Minimize the tile for now. If you plan on making your own tile, skip this step.
- Open the file 'summer_flower_by_diana_roald.pspimage', or the image you want to use. Duplicate (Shift + D). Close the original image.
- From the 'Layers Palette', right-click and select 'Promote Background Layer'.
- I chose to 'mirror' my image ('Image / Mirror'). You can skip this step if you like.
- Add a new layer ('Layers / New Layer').
- Fill this new layer with white (#ffffff). Move this layer to the bottom of your Layer Palette.
- Go to 'Image / Resize' and resize 85%. Make sure that 'Resize all layers' is NOT CHECKED:
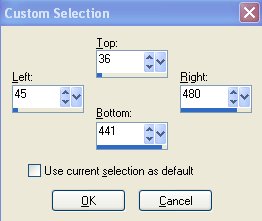
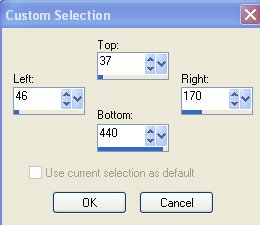
- Activate the top layer. Choose the 'Custom Selection Tool' and use these these settings:
- Right-click and choose 'Promote Selection to Layer'.
- Go to 'Adjust / Blur / Gaussian Blur' with radius set to '3'. Select None (Ctrl + D).
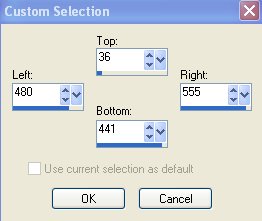
- Activate the 'Raster 1' layer - the one with the original flower image. Choose the 'Custom Selection Tool' and use these settings:
- Promote this selection to a layer (right-click and choose 'Promote Selection to Layer'). From the Layers Palette, change the 'Blend Mode' for this new promoted layer to 'Hard Light'. Select None (Ctrl + D).
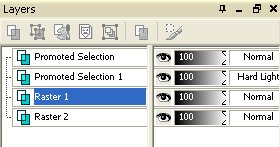
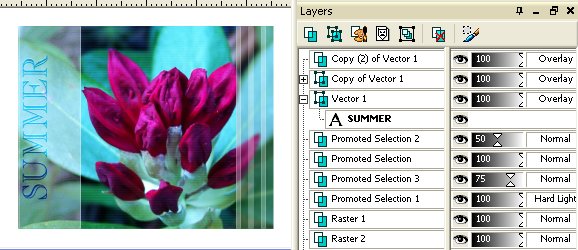
- At this point, my Layers Palette looks like this:
- Activate the 'Raster 1' layer again - the one with the original flower image.
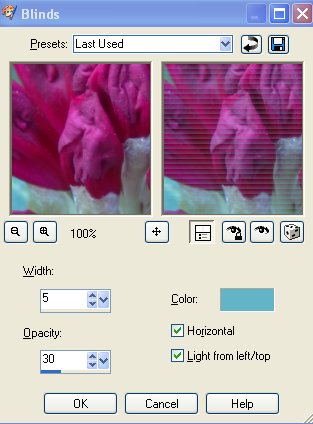
- Go to 'Effects / Texture Effects / Blinds' and use these settings (Color = #61b5c7):
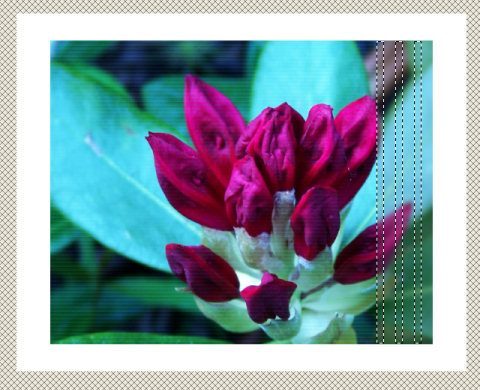
- Activate the top layer - Promoted Selection with the right part of the image. You can either load my selections ('summer_flower_tag_selection_1'), or use the rectangle selection tool to draw 3 rectangles to the right as show in the screen shot below.
The parameters for the rectangles I have drawn are: (480,37)>(490,440); (505,37)>(515,440); (530,37)>(540,440)
If you are not using PSP9, you can open the .pspimage file (see supplies), which has the selections saved to the alpha channel, instead of drawing the selections yourself. From your original main image, load the selection from the alpha channel of the other file (I am not really sure if you have this function in PSP7 to be honest with you. If this doesn't work you'll just have to make the selections yourself.)
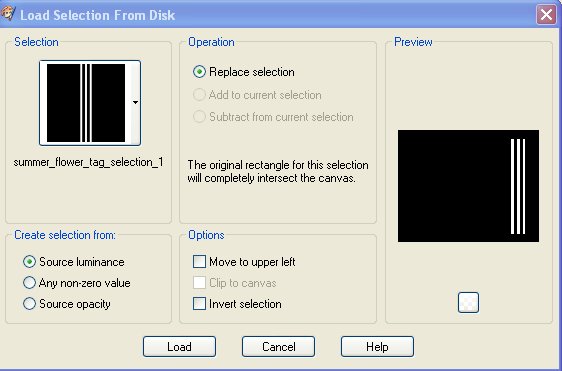
If you choose to load my selections (Selections / Load/Save Selections / Load Selection from Disk), the dialogue box should look like this:
My image after making this selection is a follows:
- Promote the selection to a layer (right-click and choose 'Promote Selection to Layer').
- Go to 'Adjust / Brightness and Contrast / Gamma Correction'. Make sure 'Link' is checked, then change the value of 'red' to '3'. The settings for 'green' and 'blue' will automatically be changed to '3'.
- Select None (Ctrl + D). Go to 'Effects / Edge Effects / Enhance More'.
- From the Layers Palette, change the opacity of this layer to 50%.
- Activate the layer 'Promoted Selection 1' - the layer with the left side of the flower image.
- Activate the 'Custom Selection Tool' and use the following settings:
- Promote this selection to a layer (this layer should be 'Promoted Selection 3').
- Go to 'Adjust / Brightness and Contrast / Gamma Correction' and use the same settings as before (Red, Green, Blue = 3).
- Select None (Ctrl + D). Go again to 'Effects / Edge Effects / Enhance More'.
- From the Layers Palette, change the 'opacity' of this layer - 'Promoted Selection 3' - to 75%.
- Activate the top layer. Activate the 'Text Tool'. Close the foreground color. Set the background color to a dark color from your image. I used #1c3768. Use these settings:

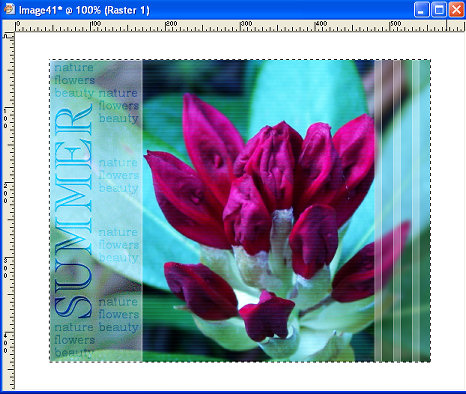
- Type in your text. I typed the word 'SUMMER' in all caps.
- Go to 'Image / Rotate' and rotate this layer 'left 90 degrees'.
- Move your text in place. I also like to align my text vertically in the center of the canvas ('Objects / Align / Vertical Center in Canvas'):
- Go to the Layers Palette and change the 'Blend Mode' of the new text layer (Vector 1) to 'Overlay'.
- Duplicate this vector text layer 2 times so that you have a total of 3 vector text layers.
- Activate the top vector layer and convert this vector layer to a raster layer (right-click and choose 'Convert to Raster Layer'). At this point my image and Layers Palette look like this:
- With the top text layer (raster) active, go to 'Effects / Texture Effects / Rough Leather' and use these settings (Leather color = '#aa1488'):

- Activate the top layer. Choose the 'Text Tool'. Your foreground color should still be closed and your background color the same color as before (#1c3768). Use the following text settings:

- Type in your text. I typed the words 'nature', 'flowers', and 'beauty' - each on a separate line. Don't forget to adjust the setting for 'Leading' if you choose to have text over 2 or more lines.
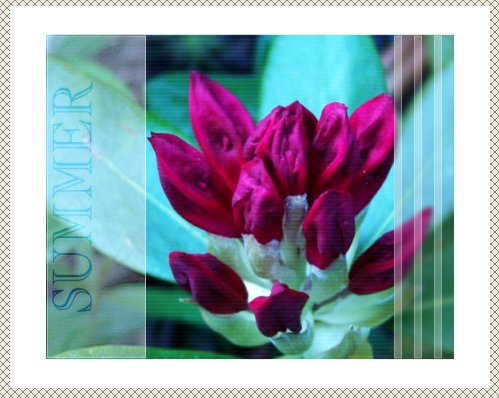
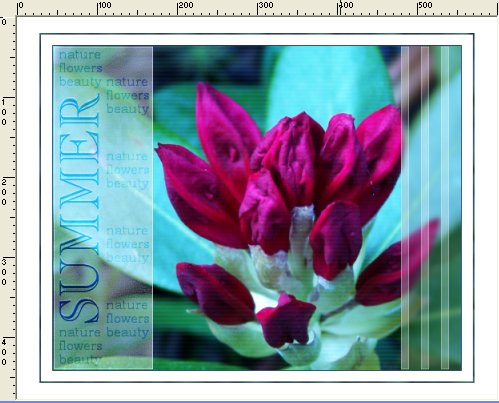
- I duplicated this vector text layer 5 times so that I had a total of 6 vector text layers with the text 'nature, flowers and beauty'. I moved the vector text layers around so that they formed a sort of border around the other text. See the final image at the top of the tutorial for reference.
Here the 'Objects / Align' tools are useful. When I was satisfied with the top and bottom text sections to the right (the column with 4 sets of text), I used the 'Objects / Distribute / Vertical Center' function to space these 4 text sections evenly. - When you are satisfied with the placement of your text, go to 'Layers / View / None'. Then make only the last 6 vector text layers visible - the layers with the text 'nature, flowers, beauty' (click on the 'eye' for each of these layers). Then go to 'Layers / Merge / Merge Visible'. Change the 'Blend Mode' of this new 'Merged' layer to 'Overlay'.
- Make all of your layers visible ('Layers / View / View All').
- Activate the original photo image layer - for me 'Raster 1' - 2nd layer from the bottom. Choose 'Selections / Select All/', then 'Selections / Float' followed by 'Selections / Defloat'. You should have 'marching ants' around the main image as follows:
- Go to 'Selections / Expand' and expand the selection by '1' pixel. Activate the bottom white background layer ('Raster 2'). Add a new layer ('Layers / New Layer').
- Fill this layer with the same dark color you used for your text. I used #1c3768.
- You can use the seamless tile provided in the supplies, or make your own. To make your own, find an area of your image that you think will make a nice frame. Mark this area with the 'Selection - Rectangle Tool'. Make sure you are on the correct layer when you copy this selection ('Edit / Copy'). Then paste this selection as a new image ('Edit / Paste / Paste As New Image'). Use the seamless tile effect in PSP (Effects / Image Effects / Seamless Tiling) or use a plugin to make the tile seamless.
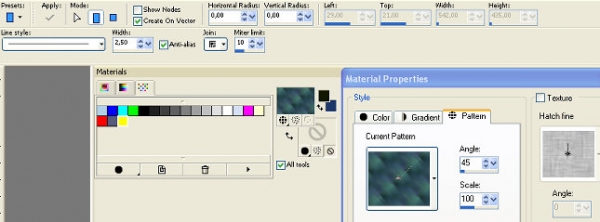
- With blue background layer active ('Raster 3'), activate the 'Preset Shape - Rectangle Tool'.
- Go to the 'Materials Palette'. Close the background. Click on your foreground, then choose 'Pattern'. Locate the seamless tile in the category 'Open Images'. Use these settings:
- Draw a rectangle around your main image. Adjust the width and height to your liking. Go to the 'Tool Options Palette' and click on the 'Position on Canvas - Center In Canvas' icon to center your frame around your main image (which should be in the center of your canvas). I had to adjust the rectangle frame several times, repeating the 'Center In Canvas' adjustment each time, until I finally got the frame the way I wanted it.
- Go to the Layers Palette and duplicate this layer (right-click and select 'Duplicate'). Remain on the 'Copy of Vector 2" layer. Right-click and choose 'Arrange / Move Down'.
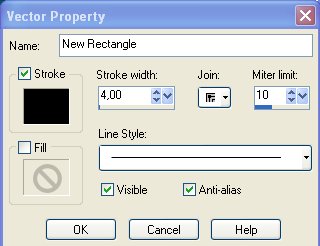
- Double-click the vector copy and change the settings as follows (color = black #000000):
- Select the black rectangle (use 'Object Selection Tool'), then go to 'Tool Options Palette' and click on the 'Position on Canvas - Center In Canvas' icon to place this rectangle directly behind the other rectangle.
- Activate the blue pattern rectangle - Vector 2 layer. Convert this layer to a raster layer.
- Go again to 'Effects / Edge Effects', but this time choose 'Enhance'.
- Hide the bottom white background layer. Activate the 'Selection Tool'. From the 'Tool Options Palette', click on the icon 'Create selection from - Merged Opaque'.
- Activate the 'Crop Tool'. From the 'Tool Options Palette' click on the 'Snap crop rectangle to - Current selection' icon. Double-click in the center of your image or click 'Apply' from the Tool Options Palette.
- Make the bottom white background layer visible again. Add copyright information and your watermark. Export/Save as a .jpg image. And you're finished. I hope you enjoyed this tutorial!


Back to 'My Tutorials Index'